How to Test Klaviyo Flows Before and After You Launch
The fastest way to test Klaviyo flows is to work in three passes. First, preview the trigger and entry filters to confirm the right profiles qualify. Second, preview and send every email and SMS with real account data. Third, switch messages to Manual mode so you can see who actually reaches each one before anything goes out. Once the flow is live, A/B tests show you what to improve.
Flows run without you, which is exactly why they fail quietly. A blank first name, an expired discount code, or a filter that blocks every profile can sit in a live flow for weeks. Klaviyo's built-in tools each check one slice of the flow and none checks all of it, so it is easy to believe a flow is tested when only the email design was.
This guide walks through each pass as a numbered step, then covers flow A/B tests after launch. Chromex builds and optimizes flows for ecommerce brands. Work through it in order and you will know what each tool proves and what it leaves open.
What to know before you test a flow
A Klaviyo flow can break in three places: who enters, what happens along the way, and what the message says. Test each layer on its own, because no single Klaviyo tool covers all three.
The three layers to test
Each layer has a different failure and a different tool, so keep them apart in your head and on your checklist.
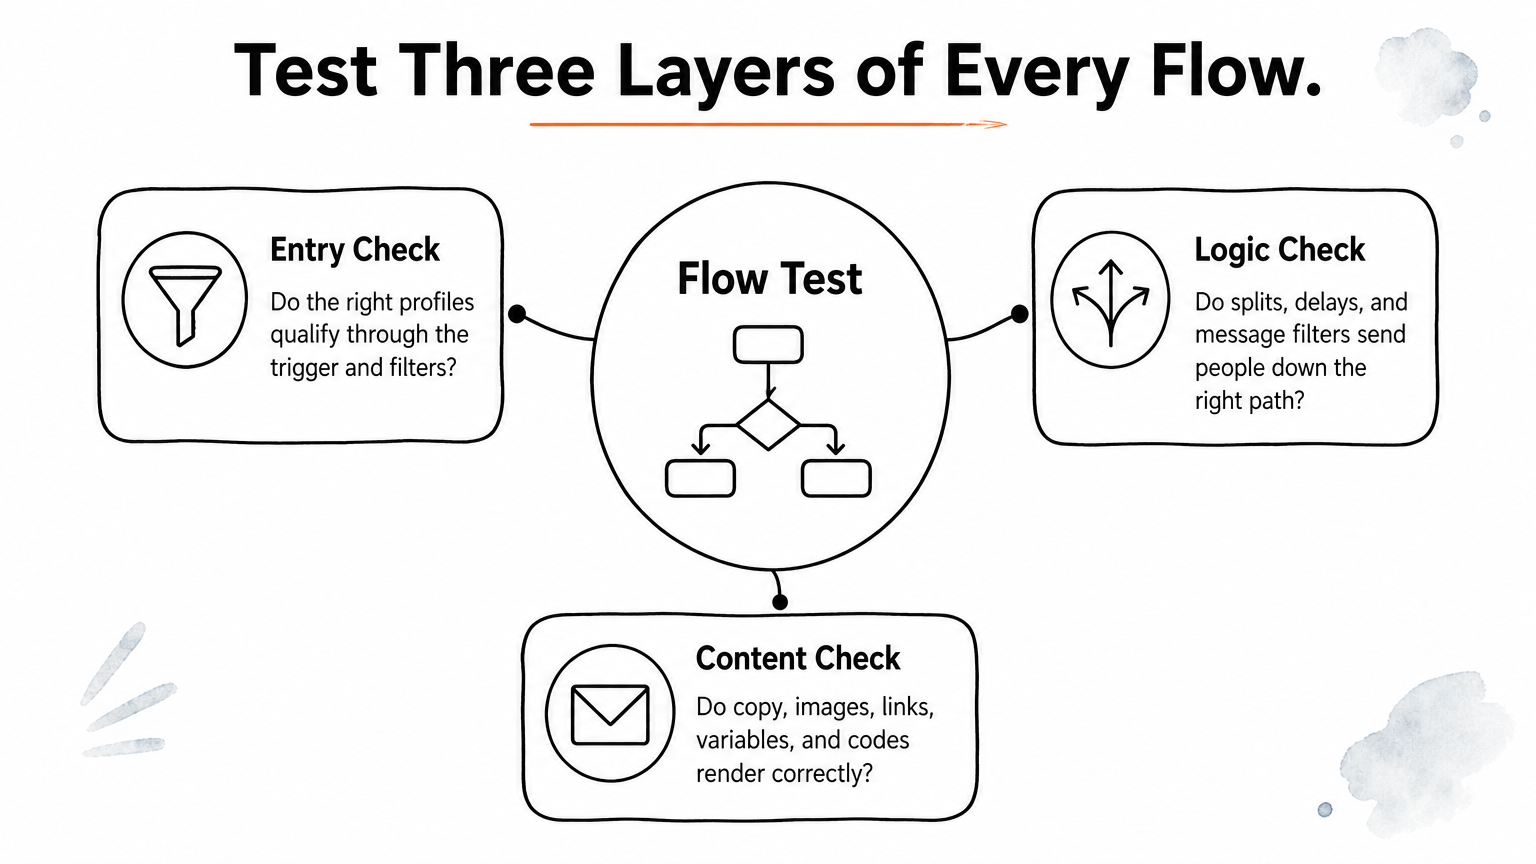
- Entry: Do the right profiles qualify through the trigger and the filters?
- Logic: Do splits, delays, and message-level filters send people down the right path?
- Content: Do the copy, images, links, variables, and discount codes render correctly?
Not every flow needs all three. Klaviyo notes that a very simple flow without flow filters, such as a basic newsletter welcome series, or one built from a Klaviyo flow idea, can skip the logic test and go live. You should still preview the content of every message.
What to test in common flows
The flow type tells you where mistakes tend to hide. This table lists the most common ecommerce flows and the first thing to check in each.
| Flow | Typical trigger | Check first |
|---|---|---|
| Welcome series | Added to a list or segment | Discount code, first-name fallback, delay before email 2 |
| Abandoned cart | Started Checkout event | Cart items, checkout link, exit once an order is placed |
| Post-purchase | Placed Order event | Order variables, product details, timing of follow-ups |
| Winback | Segment | Entry filters, exclusion of recent buyers |
Set up a test profile
Create a profile with your own email address and, if you send SMS, your own phone number. Make sure it has the consent your flow requires, or its messages will never arrive and you will chase a problem that is not in the flow. Create a second profile that should not qualify, such as someone who just bought, so you can prove the filters block people as well as admit them.
For SMS, confirm your account has an active sending number for the recipient's country and that its registration is complete. Test texts cannot go out from an unregistered number.
Test entry, logic, and content separately, because a flow can pass one layer and still fail another.
Step 1. Preview the trigger and entry filters
Use the flow trigger preview to check whether example profiles would enter the flow and pass its entry filters. It answers one question only: who gets in. It does not test splits or filters on individual messages.
Run the trigger preview
Open the trigger setup in the flow builder and run the preview with your two test profiles.
- Pick one profile that should qualify, such as your test profile with a recent Started Checkout event.
- Pick one that should not, such as a recent buyer in an abandoned cart flow.
- Run the preview and confirm the first qualifies and the second does not.
- If either result is wrong, fix the trigger or filters now, before you test any messages.
Do this before you polish emails. A perfect message behind a filter that admits nobody earns nothing.
Why a profile fails to qualify
When a profile you expected does not qualify, the cause is usually one of a short list. The trigger filter may be narrower than you intended. A profile filter may exclude the profile, for example by list or segment membership. The profile may lack consent for the channel. Or it may have already been through the flow, so check the re-entry setting.
Fix the cause, run the preview again, and only then move on. Changing filters without re-running the preview is how a second problem slips in behind the first.
The trigger preview tells you who gets in, not who gets which message, so treat it as pass one of three.
Step 2. Preview and send test messages
Preview every message with real data, then send a test to your own inbox or phone. The preview shows how the message renders for a specific profile, and the test shows how it arrives.
Preview and test an email
You can do this while editing each flow email.
- Click Preview in the upper right.
- Select the event and person whose data you want to see.
- Click Send test to receive the email in your inbox.
- Optionally, use Inbox testing to preview the email in different inboxes.
- Optionally, create a shareable preview link. It lets up to 10 reviewers see the latest version without a Klaviyo login.
The shareable link is useful for sign-off. A founder or designer can check the email without being added to your account.
Preview and test an SMS
Select the SMS in your flow and click Edit. Content sits on the left, the mobile preview in the center, and the Preview button is in the upper right. Open it, choose preview data, then select a country code, enter your number, and click Send test. Test sends do not use SMS credits, but they count toward a daily test-send limit.
Check the Compliance tab too. Opt-out language and a US organization prefix are added to the message, and the preview shows where they land. The prefix comes first and the opt-out text at the end. Any image or GIF turns the message into an MMS, which is worth knowing before you test.
Check variables with more than one profile
Preview each message with at least three profiles: one with full data, one with sparse data, and one with an edge case such as a large cart. For metric-triggered flows, the panel lets you step through up to 10 recent events. Open All properties to see the available variables and click a line to copy it. Look for empty names, broken product blocks, missing images, and links that point to the wrong page.
Previewing a profile does not prove it would enter the flow, so keep the Step 1 result in mind.
Preview with a sparse profile as well as a perfect one, because real customers rarely have perfect data.
Step 3. Run the flow in Manual mode
Set the messages you want to test to Manual mode and trigger the flow with real events. Manual messages are scheduled in real time exactly as if they were live, but nothing sends automatically. They wait for your review.
Trigger real events and read the queue
Use your test profile to do what a customer does. Start a checkout and abandon it, place a test order, or subscribe through your sign-up form. Then watch the message's queue.
- Waiting: The profile entered the flow and is waiting for its scheduled send time.
- Needs Review: The send time arrived and the profile passed the flow's filters.
From Needs Review you can send one message, send all of them, or cancel them. Because scheduling runs in real time, a four-hour delay means a four-hour wait. If you shorten a delay to test faster, write it down and restore it before going live.
When nobody shows up
An empty Needs Review tab does not always mean the flow is broken. Work through these checks in order.
- Confirm someone actually triggered the flow.
- Check entry eligibility with the trigger preview from Step 1.
- Allow for profiles still in Waiting.
- Look at message-level settings such as smart sending, which can skip a message.
This is also the quickest answer to why a Klaviyo flow is not working. Most dead flows trace back to entry rules or to timing, not to the emails.
Go live
When the queue shows the right people and the previews look right, set the messages to Live. Then check the flow again after the first day. Look at who entered, who received what, and whether anything landed in the wrong branch.
Manual mode is the only built-in way to see who reaches a message at send time without sending to them.
Step 4. A/B test your live flow
Once the flow works, A/B test it one variable at a time. Testing more than one variable at once muddies the results, because you cannot tell which change moved the number.
Choose what to test
Match each variable to the metric it influences. Subject lines affect opens. Content and layout affect clicks. Timing and the number of messages affect conversions, so watch open and click rates there too, because an extra message that hurts engagement can damage deliverability even if it earns revenue. This is also the kind of ongoing testing our Optimize stage covers from day 30 onward.
Set up a flow email A/B test
- Click the email in the flow builder and finish its content.
- Click Create A/B test in the Email details panel. The test starts with 2 variations.
- Select a variation to edit its name, subject line, preview text, sender name, or sender email, or click Edit Email to change the content.
- Set the weights. Equal weights are recommended.
- Open Configure under Winner Selection. Choose click rate or open rate, since those are the only two options for flow emails.
- Click Publish Test, which also changes a draft email to Live.
Variations can only be cloned or deleted while the test is a draft. On an email that is already live, the test creates two new copies, and their analytics are tracked separately from the original.
Read the results
Choose click rate as the winning metric. Apple Mail Privacy Protection can inflate open rates. Leave "End test by statistical significance" on so you do not call a winner early, and add a date limit if you want a hard stop.
Here is a worked example. An abandoned cart flow gets 40 entrants a day. A 50/50 split sends 20 people to each variation daily, or 600 each after 30 days. A 3% click rate gives 18 clicks and 4.5% gives 27. That is a gap of nine clicks, which a few unusual days could flip, so let the test run to significance.
To test timing instead, add a split before the delay with a 50% random sample, put the other delay on the second path, and copy every component so only timing differs. To end the test, set the sample to 100% or 0% and set the losing messages to Draft. Do not delete the split while profiles are still waiting on it.
Change one variable per test and let the significance setting decide, not your impatience.
Test in this order, then keep testing
Check entry first, then logic, then content, and use Manual mode to see real recipients before anything sends. After launch, let one-variable A/B tests decide what changes. Each tool proves a different thing, and skipping any of them leaves a gap a customer will find for you.
If you would rather hand this to specialists, have Chromex audit and test your flows. We build the core flows and keep testing them afterward.