Klaviyo Email Marketing Automation: How to Build Key Flows
To set up Klaviyo email marketing automation, connect your store, then build four flows in order: a welcome series, an abandoned cart flow, a browse abandonment flow, and a post-purchase flow. Give each one a clear trigger, a filter that removes people who already bought, and a delay that matches buying intent. Preview every message, then move the flow from Draft to Live.
Most stores get this wrong in the same way. They send one-off campaigns by hand, accept the library defaults, and never open the flow again. Email then stays a small slice of revenue while paid traffic keeps getting more expensive. Flows fix that because they respond to what each shopper just did. Klaviyo's own benchmarks report that flows earn up to 30 times more revenue per recipient than one-off campaigns.
This guide explains how flows work, then walks through four steps with the timing, structure, and logic you can copy into your account. We are Chromex, an email and SMS agency for ecommerce brands, and these are the same kinds of flows we build in the Create phase of our process.
How Klaviyo flows work before you build one
Klaviyo automation runs on flows. A trigger starts a flow when a shopper does something, filters and splits decide who keeps going, and actions send the email or SMS. Klaviyo handles both channels in one platform. Its edge over general-purpose tools such as Mailchimp is that it triggers and segments on store events like Started Checkout and Placed Order.
A flow is a standing response to one shopper behavior, so build each flow around a single behavior.
The parts of a flow
Every flow, however complex, uses the same five building blocks. Once you can read them, the flow library stops looking like a maze and starts looking like a checklist.
- Trigger: the event that starts the flow. Common types are list, segment, metric (such as Placed Order), date property, and price drop.
- Flow filter: rules that decide who may enter or stay, such as "has not placed an order since starting this flow."
- Time delay: the wait between steps.
- Conditional or trigger split: a branch based on profile data or event details, such as first-time versus repeat buyer.
- Action: the email or SMS. Draft actions do not send, Manual holds messages for your approval, and Live sends automatically.
What to set up first
Flows are only as good as the data and the sender behind them. Before you build anything, check four things:
- Your store integration is synced, so events like Started Checkout and Placed Order appear in Klaviyo.
- Your sending domain is authenticated, which protects deliverability from day one.
- A sign-up form with clear consent feeds a dedicated list.
- Your own email address sits on that list, so you can test every flow as a real subscriber.
The flows to build first
This table shows the five flows covered in the steps below, with the trigger and starting timing for each. Build the first four before you touch win-back.
| Flow | Trigger | First send | Emails |
|---|---|---|---|
| Welcome series | Added to sign-up list | Immediately | 4 |
| Abandoned cart | Started Checkout | 1 to 4 hours later | 3 |
| Browse abandonment | Viewed Product | A few hours later | 2 |
| Post-purchase | Placed Order or Fulfilled Order | After shipping or delivery | 3 |
| Win-back | Time since last order | 30 days to 12 months, by product | 2 to 3 |
Step 1. Build the welcome series
A welcome series is a list-triggered flow of four emails that starts the moment someone subscribes. Build it first. Subscribers are most engaged right after signing up, so this flow usually earns more than any other email you send.
Send the first welcome email immediately, because the promise on your sign-up form expires the moment the subscriber leaves.
Set the trigger and the timing
Choose the list trigger and select the list your sign-up form feeds. Put no delay before email 1. If your form promised a discount, a delayed message feels like a broken promise. Use a unique coupon code from Klaviyo's coupon feature, so a shared code does not leak to coupon sites.
For the rest, space the emails out with short delays: one day before email 2, two days before email 3, three days before email 4. Shoppers who have not bought still remember you at that pace, and you are not crowding their inbox.
Write the four emails
Give each email one job. Do not repeat the same offer four times.
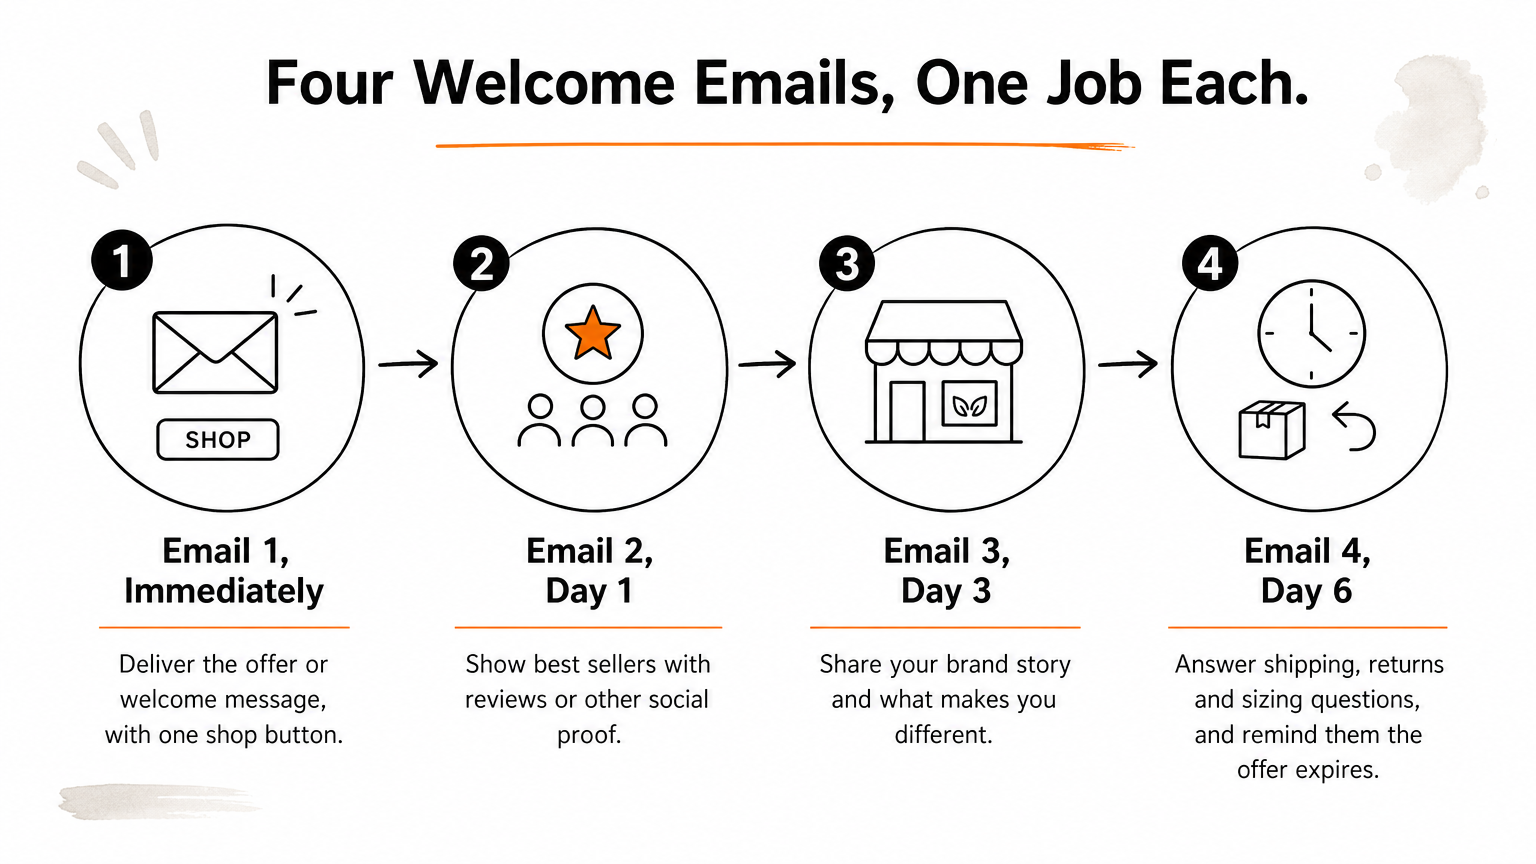
- Email 1 (immediate): deliver the offer or welcome message, with one button to shop.
- Email 2 (day 1): best sellers with reviews or other social proof.
- Email 3 (day 3): your brand story and what makes you different.
- Email 4 (day 6): answers to common objections such as shipping, returns, and sizing, plus a reminder that the offer expires.
Add a split so buyers exit
After email 1, add a conditional split that checks whether the profile has placed an order since entering the flow. If yes, end the flow or send a short thank-you. Without it, a customer who bought within the hour still gets "Still thinking about it?" three more times. That is one of the fastest ways to look careless.
Step 2. Build abandoned cart and browse flows
The abandoned cart flow is a three-email sequence triggered by Started Checkout. It recovers shoppers who showed real buying intent and left. Browse abandonment is its lighter sibling for shoppers who only looked at products. Build the cart flow first, because it recovers the most revenue per recipient.
Time your first cart email within hours, while the shopper still remembers what was in the cart.
Set up the abandoned cart flow
Trigger on Started Checkout, which on some setups can be Added to Cart. Add a flow filter so the person leaves the flow once they place an order. Then build three emails:
| Delay after trigger | Job | |
|---|---|---|
| 1 | 1 to 4 hours | Plain reminder with the exact items, shown through a dynamic product block |
| 2 | 24 hours | Address objections: shipping, returns, reviews |
| 3 | 48 to 72 hours | Last reminder, with an incentive only if your margins allow it |
Hold the discount for email 3. If email 1 offers a code, you train shoppers to abandon on purpose. Test your delays too. A 1-hour first email suits impulse products, while higher-priced items often do better at 3 to 4 hours.
A quick worked example shows what the flow is worth. Assume your store sees 2,000 checkout starts a month, the flow recovers 5% of them, and your average order is $65. That is 100 recovered orders and $6,500 a month. Add 1 point to the recovery rate and you add $1,300.
Add the browse abandonment flow
Trigger on Viewed Product (make sure Klaviyo's onsite tracking is active; most store integrations enable it for you). Filter out anyone who started checkout or placed an order, so this flow never overlaps with the cart flow. Send two emails: the first shows the products they viewed, the second shows similar or complementary items. Keep the design plain, with one hero image and one button.
Set a flow frequency limit. A shopper who browses ten times a week should not get ten emails.
Step 3. Build post-purchase and win-back flows
The post-purchase flow turns a first order into a second one, and the win-back flow reaches buyers who have gone quiet. Together they are your retention engine. They take the least effort to build and often get skipped, which is why they are worth doing early.
Retention flows pay off because the customer already trusts you, so the cost of the next sale is close to zero.
Build the post-purchase flow
Trigger on Placed Order, or on Fulfilled Order if you want timing tied to shipping. Your store platform should handle order confirmations, so use this flow for everything after that. Add a conditional split on number of orders, so a first-time buyer gets education and a repeat buyer gets recognition.
- Thank you and how-to (1 to 3 days after shipping): care or setup instructions, a tone of appreciation, no hard sell.
- Review request (after delivery): time it to when the product has been used. A fast-shipping store can ask after 7 days. A slow one needs 14 or more.
- Cross-sell (2 to 3 weeks after purchase): products that pair with what they bought, plus a nudge toward your loyalty or referral program if you have one.
Build the win-back flow
Trigger on a segment of customers who have not ordered in a set window. Set the window from your own data. Use the average days between orders as a guide. Consumables such as coffee or skincare suit 30 to 45 days, while furniture can wait 6 to 12 months.
Send two or three emails. Acknowledge the gap, give a reason to come back, such as a new product or a small offer, and ask one question: "What would bring you back?" Replies from lapsed buyers tell you more than any dashboard. Suppress anyone who still does not engage after the last email, so they stop dragging down your deliverability.
Step 4. Test, launch, and improve your flows
Before any flow goes Live, preview it as a real subscriber, then track revenue per recipient to see whether it works. A flow you never review will decay, because products, offers, and shopper habits change.
Judge a flow by revenue per recipient, not by open rate.
Run a pre-launch check
Work through this list for each flow before you switch it on:
- Send a test through your own profile and click every link.
- Check dynamic blocks (cart items, viewed products) with a real test event.
- View on mobile and in dark mode.
- Confirm every exit filter, especially "placed order since starting flow."
- Set the actions to Live and confirm the flow status is Live.
Measure and test one thing at a time
Open rates are unreliable now, because Apple Mail Privacy Protection inflates them. Watch revenue per recipient, click rate, and conversion rate instead. Test one variable at a time, starting with subject lines, then send timing, then the offer. Give each test enough sends to settle before you declare a winner.
Avoid the common leaks
Four mistakes cost the most revenue:
- Flows that overlap, so one shopper receives cart and browse emails at once.
- A discount in every email, which trains shoppers to wait.
- Missing exit filters, so buyers keep getting "come back" messages.
- Launching and never reviewing the flow again.
Start with one flow, then stack the rest
Klaviyo automation works when each flow answers one shopper behavior, with a trigger you trust, an exit filter, and timing that fits the intent. Start with the welcome series, add the cart and browse flows, then post-purchase and win-back. Test one variable at a time and read revenue per recipient.
If you would rather have specialists do the build, audit, and ongoing testing, talk to Chromex about your Klaviyo flows. We start with a full audit and a 60-day action plan, then build the core sequences and keep testing them.