Omnisend API: How to Generate a Key and Connect Your Store
To use the Omnisend API, generate an API key in Store Settings, limit it to the permissions your integration needs, send contact and order data through the REST API, add the JavaScript snippet for site tracking, and check API Logs until your requests succeed. You only need this route if your store is not on Shopify, WooCommerce, or BigCommerce, because those platforms connect to Omnisend natively.
The problem is that custom stores have no plugin to lean on. If you run Magento, OpenCart, a headless build, or a CRM that holds your subscribers, nothing reaches Omnisend until you wire it up. Without that data, abandoned cart emails, order confirmations, and browse abandonment flows never fire. The documentation is also split across a reference site, a key guide, and several support articles, so it is hard to see the order of work.
This guide puts the work in one sequence: what the API does, how to create a key, how to send data, how to track behavior, and how to debug. Chromex Marketing is an official Omnisend partner that builds email and SMS programs for ecommerce brands, so the focus here is on the steps that decide whether your automations actually trigger.
What the Omnisend API does and who needs it
The Omnisend API lets your store or app send data to Omnisend and retrieve data from it automatically, with no manual uploads. You need it when your platform has no native Omnisend integration, or when you want custom features such as custom events or a CRM sync.

Two APIs with different jobs
Omnisend offers a REST API and a JavaScript API. The REST API moves data between your server and Omnisend. The JavaScript API tracks what visitors do on your site. Most integrations use both.
| REST API | JavaScript API | |
|---|---|---|
| Runs | On your server | In the visitor's browser |
| Handles | Contacts, orders, products, carts, events | Page views, product views, cart additions |
| Powers | Order confirmation, abandoned cart, list sync | Browse and product abandonment |
Check that you actually need it
Shopify, WooCommerce, and BigCommerce stores should use the native plugin, which is faster and needs no code. Reach for the API if you run Magento, OpenCart, or a custom platform, build a third-party app integration, or want webhooks and custom event tracking. Shopify users can still add the JavaScript API for custom events.
Before you start, have these ready:
- Access to your store's backend code.
- Working knowledge of REST APIs and JSON, or a developer who has it.
- An Omnisend account with permission to create keys.
The API is for stores without a native integration, and for custom features on top of one.
Step 1. Generate your API key
Go to Store Settings, open API keys, and click Create API key. Name the key after the app you are connecting, choose its permissions, then copy it before you close the screen.
Create the key
- Open Store Settings, then API keys, then click Create API key.
- Type the app name, such as Zapier, Typeform, or your own integration name. If Omnisend recognizes the app, a setup wizard replaces the manual steps.
- Select the permissions (covered below).
- Click Create API key, then Copy API key.
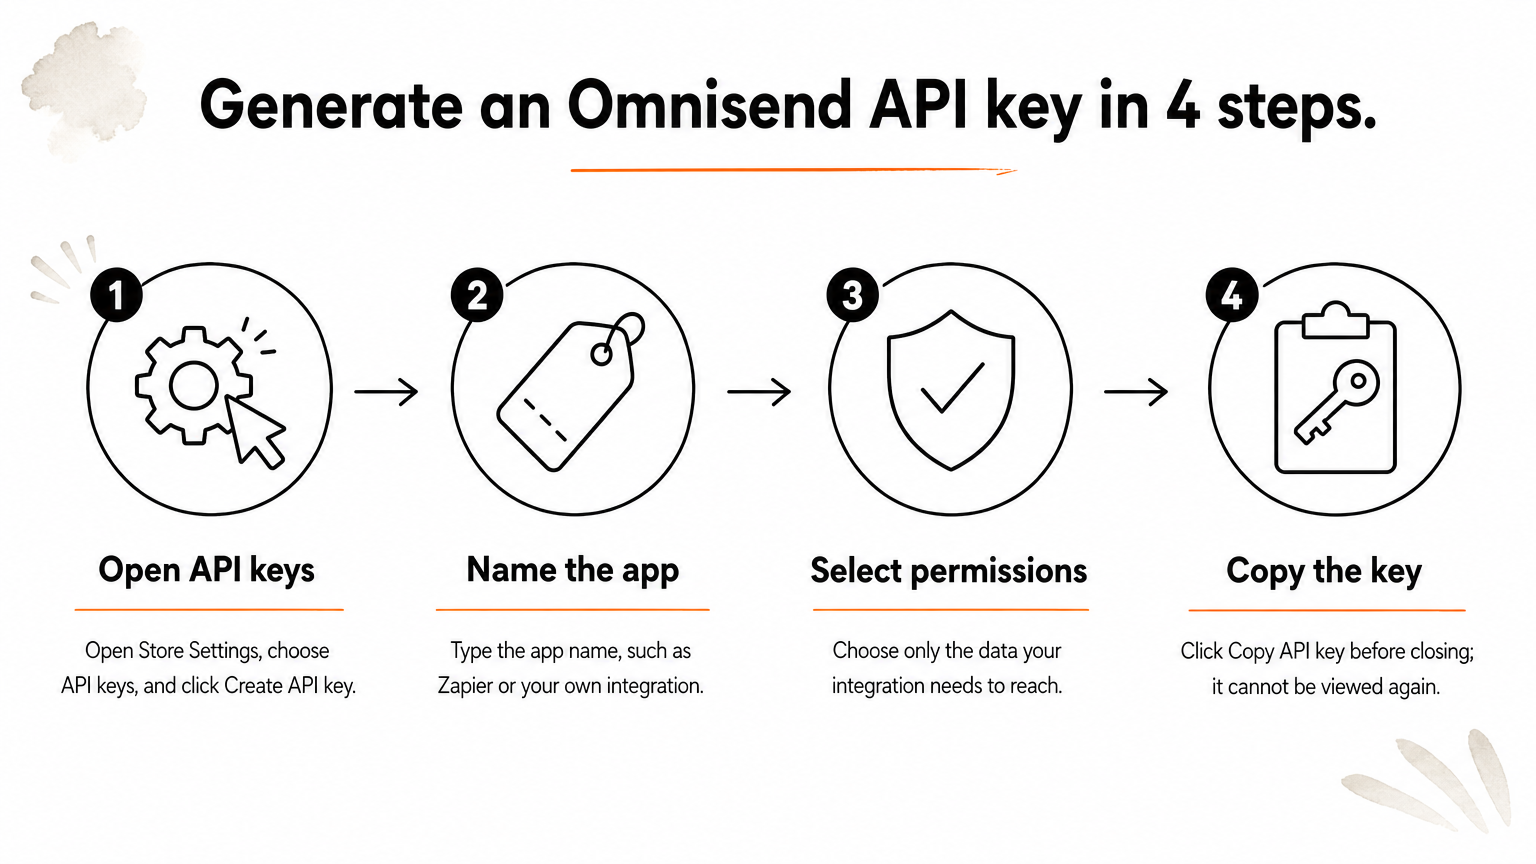
You cannot view the key again once you close that screen. If you lose it, generate a new one. Keys are also case-sensitive, so paste them exactly as shown.
Grant the narrowest permissions
Each key can reach only the data you allow. Create a separate key per integration so you can track usage and revoke one without breaking the others. You can create as many keys as you need.
| Permission | What it allows |
|---|---|
| Campaigns | Downloading reports and recipient lists |
| Contacts | Creating, editing, downloading, deleting contacts |
| Orders | Creating, editing, downloading, deleting orders |
| Products | Creating, editing, downloading, deleting products |
| Carts | Creating, editing, downloading, deleting carts |
| Events | Triggering and retrieving custom events |
A contact form needs only Contacts. A reporting tool might need Campaigns and Orders. To revoke a key, return to the API keys page and delete it. Store the key in a server-side environment variable, never in front-end code.
Copy the key the moment you create it, because Omnisend will never show it again.
Step 2. Send contacts and orders through the REST API
Send your first request to confirm that your key works, starting with a single contact. Once that succeeds, pass order and cart data so Omnisend can trigger its transactional and recovery workflows.
Create a test contact
Authenticate by sending your key in the X-API-KEY header. This example creates one subscribed contact. Swap in a real address you control.
curl -X POST https://api.omnisend.com/v5/contacts \
  -H "X-API-KEY: YOUR_API_KEY" \
  -H "Content-Type: application/json" \
  -d '{
    "identifiers": [
      {
        "type": "email",
        "id": "test@example.com",
        "channels": {
          "email": {
            "status": "subscribed",
            "statusDate": "2026-11-22T10:00:00Z"
          }
        }
      }
    ],
    "firstName": "Test",
    "lastName": "Customer"
  }'
Then open the contact in Omnisend and confirm the fields landed. Compare the payload with the contacts reference at api-docs.omnisend.com before you build on it, since required fields are what most first requests miss.
Pass orders and carts
Order data triggers Order Confirmation and Shipping Confirmation workflows. Cart data triggers abandoned cart emails and SMS. Each needs the matching permission on your key, Orders or Carts. Send the event the moment it happens in your store, such as at checkout success, and not in a nightly batch. A delayed order event means a late confirmation email, which customers notice.
Send each order and cart event at the moment it happens, or your workflows will fire late.
Step 3. Add site tracking and custom events
The JavaScript API records on-site behavior that your server never sees. Install the tracking snippet on every storefront page, then add custom events for actions specific to your business.
Install the tracking snippet
The snippet reports page views, product views, and cart additions. Those signals feed Browse Abandonment and Product Abandonment workflows. Copy the snippet from the JavaScript snippet page in the Omnisend API docs and place it in your site's global template so it loads everywhere, not only on product pages. It also supports the Product Picker, which lets people select products inside the email builder and automation workflows.
Trigger custom events
Custom events let you start a workflow from any action your app can detect. Examples are "trial started" or "subscription renewed." Your key needs the Events permission. Name events consistently from day one, because workflow triggers depend on the exact event name, and renaming later means rebuilding triggers.
Keep the split clear. Use the REST API for events your backend knows about, such as a renewal processed by billing. Use the JavaScript API for anything that happens in the browser.
Use the REST API for what your server knows and the JavaScript API for what the browser sees.
Step 4. Test requests and fix errors
Open API Logs in Store Settings to see every request and response. Most failures come down to three causes: a wrong key, missing required fields, or too many requests.
Read the logs first
Send a test request, then check API Logs under Store Settings. You will see the request and the response, which tells you whether Omnisend received your data and why it rejected it if not. Do this before you touch your code.
| Symptom | Likely cause | Fix |
|---|---|---|
| Requests rejected | Wrong or mistyped key, or missing permission | Recopy the key exactly, then check its permissions |
| Request accepted but data incomplete | Missing required fields | Compare your payload with the reference |
| Requests start failing under load | Rate limit exceeded | Queue requests and retry with a delay |
Confirm the workflow fires
A successful request is not the same as a working automation. Place a test order with an email address you control, then check that the contact appears, the order is attached, and the right workflow sends. Repeat for a cart you abandon on purpose. If a workflow stays silent, check that it is live and that its trigger matches the event you sent.
A 200-level response proves delivery, not that your workflow fired, so always test the full path.
Start small, then build the flows
Set up one key with minimal permissions, send one test contact, and confirm it in API Logs. Then add orders, carts, tracking, and custom events one at a time. Testing each layer separately makes failures easy to locate.
The API only moves data. The revenue comes from the flows that data triggers, and that is the work Chromex Marketing does for ecommerce brands on Omnisend and Klaviyo. If your data is connected and you want the automations built and tested, book a call with Chromex Marketing to scope it.