Omnisend Segmentation: How to Build Segments That Convert
To use Omnisend segmentation, open the Audience tab, go to Segments, click Create segment, and choose a prebuilt segment, the AI builder, or a blank start. Then add filters for behavior, engagement, or purchase history, join them with AND or OR, name the segment, and save it. Omnisend keeps the segment current on its own, so you can pick it right away as the audience for a campaign, an automation, or a signup form.
The real problem is sending one message to everyone. Buyers get a first-order discount they do not need. Inactive contacts drag down your open rates. Cart abandoners get the same newsletter as your best customers. Omnisend holds the data to fix this, but the filter list is long, and it is easy to build a segment that is empty, too broad, or aimed at people you cannot email.
This guide covers what to check before you start, then four steps: open the builder, add filters, save and maintain the segment, and put it to work. You also get a table of six segment recipes to copy. It comes from the Omnisend setup work we do at Chromex Marketing, an official Omnisend partner that runs email and SMS programs for ecommerce brands.
Before you build: how segments work in Omnisend
An Omnisend segment is a saved set of filters that sorts your contacts into a group automatically. You do not fill it by hand. Contacts enter when their data matches the rules and leave when it stops matching, so the group stays current without upkeep.
What a segment is and the four main types
Segments draw on the data Omnisend collects: profile fields, engagement history, subscription and channel preferences, website activity, and shopping behavior. Those sources map to the four classic types of segmentation, and in ecommerce you will lean on the behavioral type most.
| Type | Based on | Ecommerce example |
|---|---|---|
| Demographic | Birthday, gender, custom properties from forms or checkout | Birthday offers |
| Behavioral | Browsing, carts, orders, email opens and clicks | Added to cart, did not order |
| Psychographic | Interests and stated preferences | Ski buyers vs. running buyers |
| Geographic | Country, city, or postcode from orders and IP data | Local send times and shipping messages |
Some lists name a fifth type, such as firmographic segmentation for B2B or lifecycle stage. For a store, lifecycle is just behavioral data over time: new subscriber, first-time buyer, repeat buyer, lapsed buyer. You build all of those with the filters in the table above.
Start with behavior, because what a contact did tells you more than who they are.
Prerequisites to check first
Check four things before you open the builder, because each one changes what you can build.
- Plan: segmentation is available on all Omnisend plans, so you do not need to upgrade.
- Store data: the filters you see depend on your ecommerce platform and the data it syncs. If your store connects through the API, your developer has to pass the key shopping events, or purchase filters stay empty.
- Subscription status: you can segment every contact type, but campaigns only go to subscribed contacts. A large non-subscribed segment is useful for analysis, not for sending.
- Time windows: rules like "ordered in the last 30 days" behave differently from instant rules, as explained below.
Update timing deserves a closer look. Conditional segments update instantly when a contact meets the filters. Date-based segments refresh once a day at 12:00 AM, based on the time filters. A contact who passes your 90-day cutoff moves at the next midnight refresh, not the minute it happens.
Step 1. Open the builder and choose a start
Go to the Audience tab, open Segments, and click Create segment. Omnisend then asks how you want to start: a prebuilt segment, the AI segment builder, or Create from scratch.
Click path
Follow these clicks the first time.
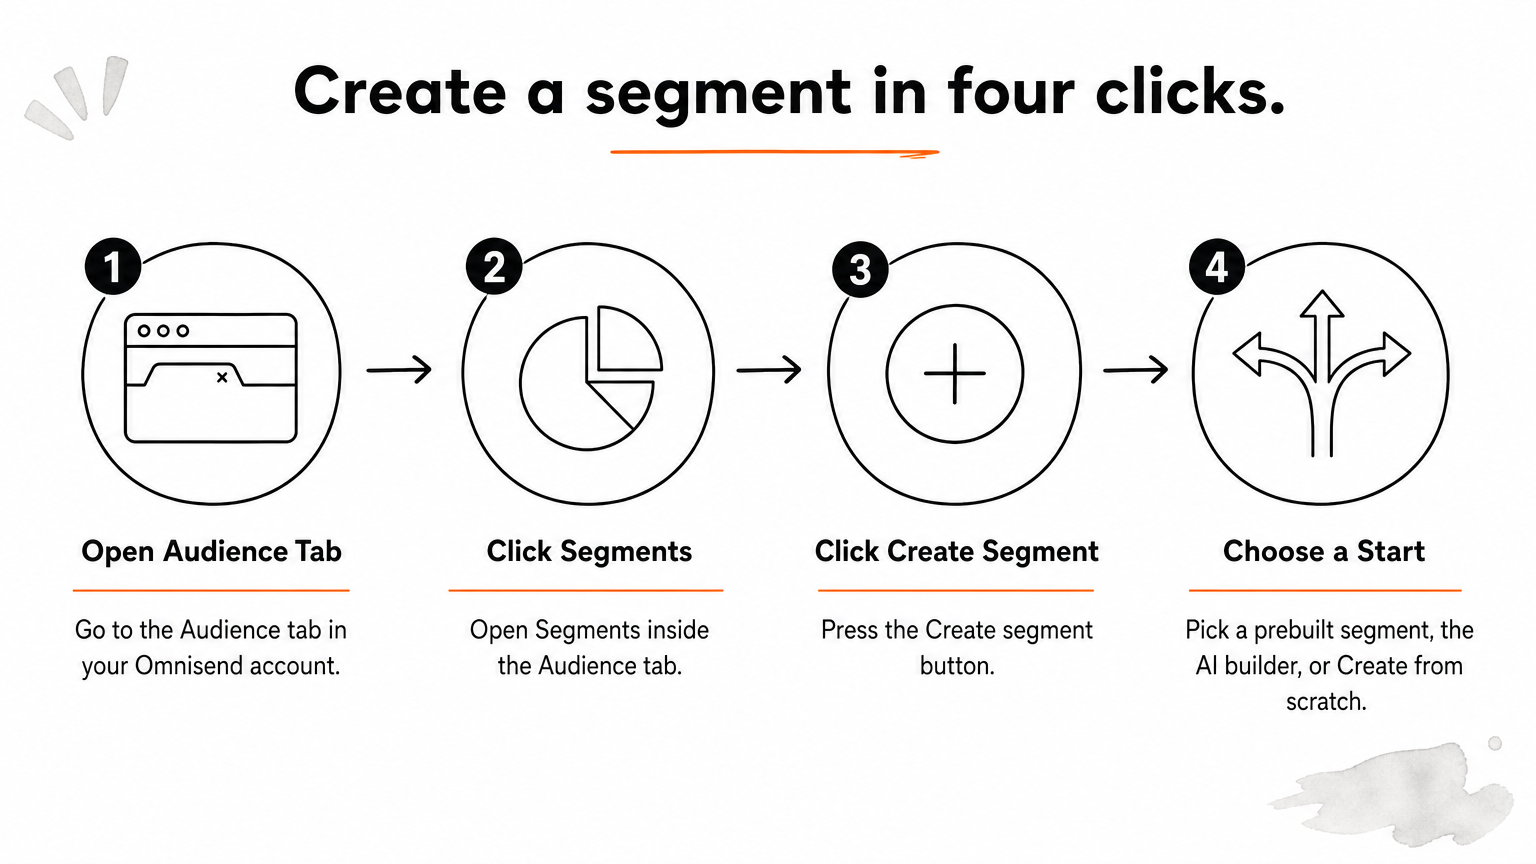
- Open the Audience tab.
- Click Segments.
- Click Create segment.
- Choose a prebuilt segment, the AI segment builder, or Create from scratch.
Prebuilt segments are presets with filters already set for common use cases. You can edit every filter after you pick one, so treat a preset as a head start, not a fixed rule. Check that its definition of "active" or "lapsed" matches yours before you rely on it.
Which starting point to pick
Pick the option that matches how clearly you can describe the group.
| Start | Pick it when | Watch for |
|---|---|---|
| Prebuilt segment | You want a common group fast | Its time windows may not fit your buying cycle |
| AI segment builder | You can describe the group in one sentence | Vague wording produces vague rules |
| Create from scratch | You need several filter groups or exact logic | It takes longer to set up |
My default is the AI builder for a first draft and the manual builder for the final edit. A preset or an AI draft is still only a draft, and the filters you did not read are the ones that cause bad sends.
Read every filter before you save, whoever or whatever wrote it.
Prompts for the AI builder
The AI builder turns plain language into segment rules. If your prompt is clear, it shows a preview. If it needs more detail, it asks follow-up questions. Click View segment in the builder to open the generated rules, then edit or add filters there.
Copy and adapt these prompts:
Customers who ordered more than once in the last 90 days
Subscribers who added a product to their cart in the last 7 days but have not placed an order
Contacts who have not opened or clicked an email in the last 90 days
Put time windows and numbers in the prompt. "Recent" means nothing to the builder, while "30 days" gives it a rule it can apply.
Step 2. Add filters for behavior, engagement, and purchases
Click Add filter, pick the condition you want, and repeat for each rule. Then decide how the rules combine: AND when a contact must meet every condition, OR when any one is enough.
How filters, groups, and operators fit together
A segment has three layers. A filter group holds one or more filters. A filter is a single condition, such as "Placed an order." A subfilter narrows a filter, such as "Product is X." Operators connect them.
AND makes a segment smaller. "Subscribed to email AND placed an order in the last 30 days" returns only contacts who meet both. OR makes it larger. "Placed an order OR added to cart" returns contacts who did either. Between two filters you pick one operator. When a filter has several subfilters, Omnisend applies the same operator to all of them.
One rule trips people up. When you add a contact property filter, such as subscription status, to another filter, Omnisend connects it with AND automatically. If you need OR logic, put the property filter in its own group. Click the arrow icon, choose Add a group of filters, and join the groups with OR.
Use AND to narrow, use OR to widen, and put property filters in their own group when you need OR.
Segment recipes for behavior, engagement, and purchases
These six segments cover most ecommerce programs. Adjust the windows to how often your customers buy.
| Segment | Filters | Best use |
|---|---|---|
| Engaged subscribers | Subscribed to email AND opened or clicked an email in the last 30 days | First audience for campaigns |
| Inactive contacts | Has not opened an email in 90 days AND has not clicked an email in 90 days | Win-back flow, or exclude from promotions |
| Cart abandoners | Added to cart in the last 7 days AND has not placed an order | Reminder campaigns and retargeting ads |
| First-time buyers | Placed an order, limited to one order | Second-purchase offer |
| Lapsed customers | Placed an order AND has not placed an order in the last 90 days | Win-back with a reason to return |
| High spenders | Order value above your own threshold | Early access and VIP perks |
Here is the lapsed customer recipe worked through. The first filter, "Placed an order" with no date limit, keeps only people who have bought at least once. The second, "Has not placed an order" in the last 90 days, removes anyone who bought recently. Add "Subscribed to email" so the segment can actually be emailed. A customer who bought 120 days ago lands in it. One who bought 20 days ago does not.
Filter mistakes that empty your segment
Most broken segments come from a handful of errors.
- Missing negative logic. To find people who have not done something, use a negative filter such as "has not placed an order." Do not look for an opposite positive filter.
- Wrong operator. Two conditions joined by AND that no contact can meet together give you zero contacts.
- Product filters that look empty. The "Ordered Product" filter lists only products someone has bought, and "Viewed Product" lists only products someone has viewed.
- Country filters that miss contacts. Use "Country exists" AND "Country is [name]" for accuracy.
Step 3. Name, save, and maintain the segment
Click Save segment, give it a name, and it appears under the Active tab on the Segments page. After saving you can view the contacts that match your filters. From then on the segment updates itself as contacts meet or leave the rules.
Name and save it
The segment name is internal, so no customer sees it. Use it to tell your segments apart six months from now. A pattern that works is audience, then rule, then window.
Buyers | Lapsed 90 days | Subscribed
Browsers | Cart abandoners 7 days
Engagement | Active 30 days
Mark your most-used segments as favorites. Favorites pin to the top of the list and are protected from automatic archiving. Use the sort arrow to order the list alphabetically or by creation date once you have more than a dozen segments.
Edit, copy, export, and archive
Each saved segment has a menu of actions, and knowing them saves rebuild time.
- Edit: add, remove, or change filters, then save.
- Copy: duplicate a segment to test a variation, such as a 60-day window instead of 90.
- Copy to another store: move a segment between stores in the same account.
- Export: download the contacts as a CSV file.
- Sync: send the segment to Facebook Custom Audience or Google Ads for targeted ads.
- Archive: make the segment read-only and remove its contacts. You can restore it from the Archived tab.
- Delete: remove the filter set permanently. Your contacts stay, but you cannot restore the segment.
Be careful when you edit a segment that an automation or form already uses. Omnisend shows a warning, because your change applies to that automation or form immediately. Contacts already midway through a flow keep receiving its remaining messages if they still match the new rules. Contacts who no longer match leave the flow.
You also cannot add contacts to a segment by hand. If you need a specific person in, use an "Email address is" or "Phone number is" filter. Or tag the contacts and filter on the tag.
Treat editing a live segment like editing a live automation, because that is what it is.
Step 4. Use segments in campaigns, automations, and forms
Pick the saved segment as the audience when you build a campaign, as the trigger or filter inside an automation, or as the targeting rule on a signup form. One segment can do all three jobs, so build it once and reuse it.
Campaigns: include and exclude
In a campaign, choose one or more segments to send to, and exclude others you want kept out. This works for email, SMS, and push notification campaigns. If a contact sits in both an included and an excluded segment, exclusion wins and the contact receives nothing.
Exclusion is the part most stores underuse. Take a last-call sale email. Send it to engaged subscribers, and exclude anyone who has placed an order in the last 14 days. Buyers are not nagged about a deal they already took, and your list stays healthier.
Automations and forms
In automations, a segment can work in three ways. As a trigger, the flow starts when a contact enters or exits the segment. As an audience filter, it limits who can enter a flow that has a different trigger. As a conditional split, it sends contacts down different branches inside one workflow.
Forms use segments for targeting. Include a segment to show a form only to that group. Exclude one to hide it, for example hiding a first-order discount popup from existing customers. You can also select all contacts in a segment and run bulk actions: add or remove tags, change subscription status, unsubscribe, or delete.
Check the segment before you send
Run this short check before any segment goes live.
- Open the saved segment and confirm the contact count is plausible for your list size.
- Open three or four contact profiles and confirm each one really fits the rule.
- Confirm the segment includes subscribed contacts for the channel you are sending on.
- Check the exclusions on the campaign, not just the inclusions.
A segment you have not spot-checked is a guess with a send button attached.
Start with three segments
Omnisend segmentation comes down to one habit: describe a group in plain terms, translate it into filters, check who lands in it, and attach it to a campaign or flow. Build engaged subscribers, cart abandoners, and lapsed customers first. Those three give you a sending audience, a recovery audience, and a win-back audience from data you already have.
If you would rather have the segments, flows, and campaigns built for you, talk to Chromex Marketing about your Omnisend setup. We work with Omnisend and Klaviyo, and our BFCM Email & SMS System includes audience segmentation and list capture strategy as part of a one-time done-for-you build.